The VERA Locomotion Accessibility Toolkit (VLAT)
Warning
The VERA Locomotion Accessibility Toolkit (VLAT) is currently being developed and tested for usability and efficacy. As such, it is considered an early-access feature of the VERA Unity package, and should be approached with caution in production experiments.
Check back regularly for updates to the VLAT, as new features and improvements are continually being added, with the goal of reaching a stable release in the near future.
Overview
The VERA Locomotion Accessibility Toolkit (abbreviated VLAT) is a set of Unity tools designed to aid in providing locomotive and mobility accessibility to VR study participants with locomotive or mobility disabilities (such as quadriplegia, cerebral palsy, muscular dystrophy, etc.).
To accomplish this, the VLAT toolkit provides a virtual menu participants may use to navigate and interact with their environment. This menu is designed to be used with only two discrete binary (on / off) inputs, which can be directly mapped to any available input device. In this way, participants can use their own accessible input devices to navigate and interact with their environment, such as a sip-and-puff device, head array, or other custom accessible input device.
By using this menu, participants can fully navigate and interact with the virtual environment, without needing to have full control of their neck, hands, or legs. The menu provides controls for looking around the environment, moving within the environment, and interacting with nearby interactable objects, solely through the use of two remappable binary inputs.
How participants use the VLAT toolkit
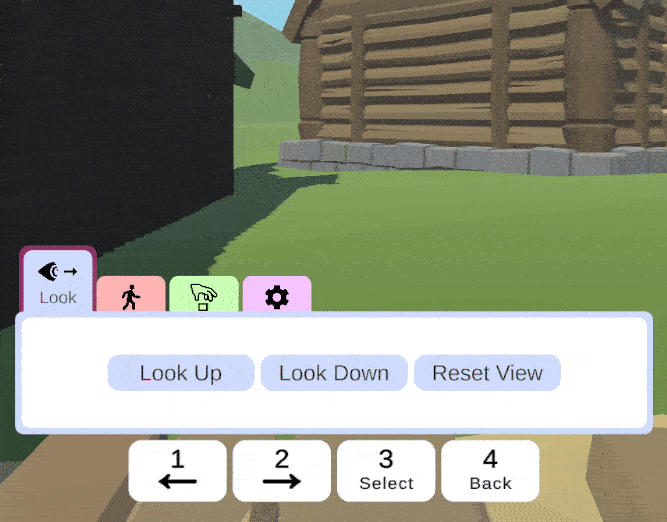
The VLAT Menu is divided into four distinct categories:
Look: Manually adjust the camera angle to view the environment without use of head tracking.
Move: Traverse the environment without use of body tracking or complex controller inputs.
Interact: Interact with nearby interactable objects without use of hand tracking.
Settings: Adjust various accessibility settings.
Depending on the participant’s settings, this menu may be navigated with four discrete binary inputs (previous menu item, next menu item, select currently highlighted menu item, go back), or only two discrete binary inputs (highlight next menu item, select currently highlighted menu item).
When participants access your experiment on the VERA site (via your experiment’s remote distribution URL), they will have access to a variety of accessibility settings. Within these accessibility settings, participants may choose to enable or disable “Switch controls”.
If you have included the VLAT toolkit in your experiment, participants with “Switch controls” enabled will have the VLAT Menu accessible for the full duration of their VR session.
Outside of the remote distribution link, you may additionally manually enable the VLAT Menu experiment-wide for all participants (for testing purposes or non-remote experiment distribution such as APKs).
Enabling VLAT for your experiment
To enable VLAT for your experiment, first import the VLAT toolkit into your Unity project. Open the Unity package manager, click the “+” icon in the top left corner, and select “Add package from git URL…”:
VLAT Toolkit Git URL
Once the toolkit has been successfully imported, you can access the VLAT Settings menu by using the “VERA > VLAT Settings” menu bar item. This settings menu provides a variety of options for configuring the VLAT Menu and its behavior.
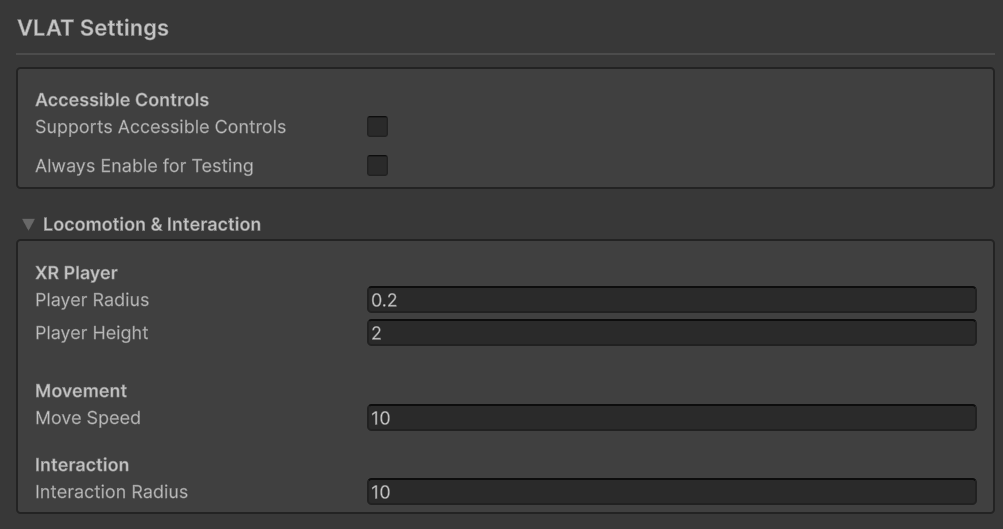
Notably in this menu, you must choose to manually enable “Supports Accessible Controls”. This will tell VERA that your experiment supports accessible switch controls, and allow participants to use the VLAT Menu to navigate and interact with your environment if they choose to enable “Switch controls” in the accessibility settings.
Warning
Only enable “Supports Accessible Controls” if your experiment has been fully tested and verified to support accessible switch controls from start to finish. If your experiment is not fully completable with accessible switch controls, participants may be unable to complete the experiment, leading to potential participant dropout.
For testing purposes, you may additionally enable the “Always Enable for Testing” checkbox. This will ensure the VLAT Menu is always enabled for testing purposes, regardless of the participant’s accessibility settings. Use this when testing your experiment’s compatability with accessible switch controls, or when building your experiment for accessible non-remote distribution (such as APKs or in-person experiments).
Once the VLAT package has been successfully imported and you have chosen to “Support Accessible Controls” in the VLAT Settings menu, you’re all set - the VLAT Menu will be automatically enabled for participants with “Switch controls” enabled, and disabled for participants with “Switch controls” disabled.
Looking (changing the view / camera angle) and Moving (traversing the environment) are handled automatically by the VLAT Menu, and do not require any additional setup. Interacting with the environment (picking up objects, pressing buttons, navigating UI menus, etc.) are NOT handled automatically by the VLAT Menu, and require additional setup.
What is an interactable?
The VLAT toolkit natively supports accessible looking (changing the view / camera angle) and moving (traversing the environment) functionality, but custom interactions must be manually configured for your specific experiment and use-case. The toolkit provides a variety of tools to help you set up accessible interactions for your scene.
In the VLAT toolkit, an Interactable represents any object or action which requires a participant to interact with it in any way to complete the experiment. Some basic interactables could include a ball which the participant could pick up, a door which the participant needs to open, or a UI menu which the participant needs to press.
Before setting up interactables, determine what objects and actions in your scene are considered “interactable”. An interactable includes any object or action which requires a participant to interact with it in any way - this can include reaching for an object or menu, pointing a controller ray at an object or menu, grabbing an object, opening a door, etc.
Note that interactables can include simple button presses - for example, if the participant needs to press a controller button / trigger to confirm an action or continue the experiment, that button press is considered an interactable. Any action which cannot be performed without use of the VLAT Menu alone is considered an interactable.
To create a list of your experiment’s interactables, determine what objects and actions in your scene are required to be interacted with in any way to complete the experiment. Think to yourself - if I only had access to the VLAT Menu, with no control whatsoever over my body, legs, hands, or head, what additional actions would I need to take to complete the experiment? Each of these additional actions is considered an interactable.
Setting up interactables
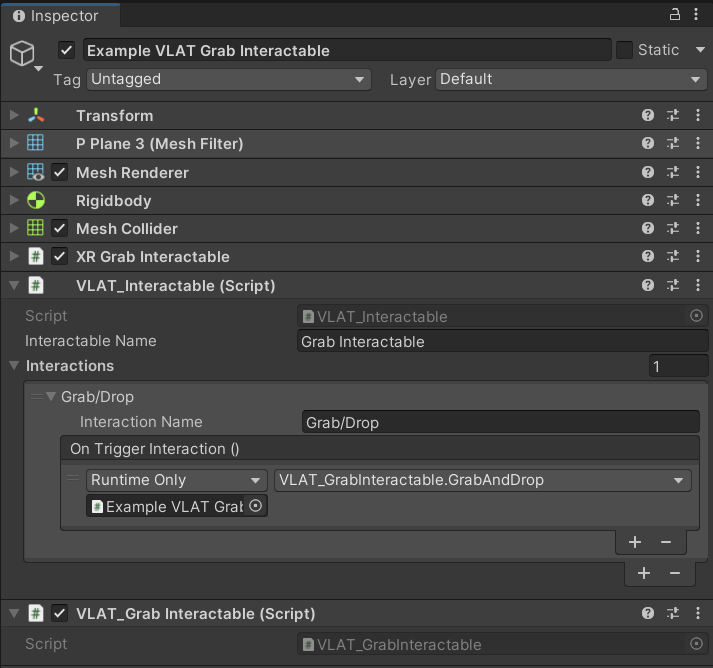
For each interactable in your scene, you must mark it as such in the Unity inspector. To do so, select the object in the scene view, and add the VLAT_Interactable script component to the object.
Once an object is marked as interactable in this way, it will be able to be selected by participants from the “Interact” section of the VLAT Menu, based on how far the object is from the participant’s current position. If the object has any renderers on it or on any child objects, these renderers will be highlighted when participants choose to interact with the object.
On the VLAT_Interactable component, you can configure various settings for how the object will be interacted with. Firstly, there is an Interactable Name field, which is the name of the object as it will be shown to the participant when interacting with it. For example, a ball you can pick up and throw might be called “Baseball”.
Next, add any desired interactions to the Interactions list by pressing the + button in the bottom right corner of the list. For each interaction, provide an Interaction Name for the interaction (such as Grab, Press, Open), and select the desired function to be run when the interaction is performed. To choose the desired function, drag-and-drop the desired script component from the project window onto the interaction’s inspector, then select the desired function from the dropdown.
Many interactions may require you to manually hook up code or configure additional settings. For example, if you wanted to allow a participant to pull a lever which shoots confetti, you would need to manually hook up a function to the interaction which would trigger the confetti effect.
However, the VLAT toolkit does provide a few default interaction scripts which can be used to quickly and easily set up common interactions. To use these common interactions, simply add the corresponding script component to the object, and select the corresponding function for the desired interaction:
VLAT_GrabInteractable.cs: Allows users to grab / drop an object, without needing to physically hold on to the object.
VLAT_DoorInteractable.cs: Allows users to open / close a hinged door, without needing to physically open the door.
VLAT_DrawerInteractable.cs: Allows users to open / close a jointed drawer, without needing to physically open the drawer.
Next steps
It is highly recommended to test your experiment from start to finish with accessible switch controls enabled, to ensure that the experiment is fully accessible and usable by participants with disabilities. This means enabling “Switch controls” in the accessibility settings, and then running your experiment with the VLAT Menu enabled, doing so as if you had no control whatsoever over your body, legs, hands, or head - just the use of the switch controls / VLAT Menu alone. This will help you identify any issues with your experiment’s accessibility, and ensure that participants with disabilities can fully navigate and interact with your environment.
It is additionally highly recommended to implement standard VR accessibility features such as snap turning, teleportation, large UI elements / buttons, and other features which help to improve the accessibility of your experiment (VLAT is meant for participants with “extreme” disabilties, and is not a replacement for standard VR accessibility features).
The VLAT toolkit is still under active development, and new features and improvements are continually being added. Check back regularly for updates to the toolkit.