Quickstart
This quickstart guide provides a high-level overview of how to get started with VERA. This guide will give a rapid-fire preview of the steps required to run an XR experiment with VERA, from installation to data collection.
If you’d like a more detailed guide, see the Installation and setup section. To engage in a hands-on demo of the steps outlined in this guide, see the VERA Sandbox Demo: Intro section.
Installation
To use VERA, you need to install Unity, editor version 6000.0 or later, and install the VERA Unity package from the Unity Package Manager (from the Unity menu bar, select Window > Package Management > Package Manager, then click the + button in the top left corner and select Add package from git URL…).
VERA Package URL
This will install the VERA Unity package into your Unity project, and install all necessary dependencies. For more details, see the Installation and setup section.
Authenticate your Unity project
To connect your Unity project to the VERA web interface, you need to authenticate your project with your VERA account.
Log In to the VERA Website: In a web browser, navigate to the VERA Website. Log in or sign up.
Authenticate Your Unity Project: In the Unity menu bar, find the VERA tab and select Settings. In the newly opened VERA Settings window, click Authenticate. This will open a web browser to the VERA web interface, linking your Unity project to your VERA account.
Ensure You are Logged In: Return to Unity and ensure the VERA Settings window shows your account information.
Create an experiment on the web interface
To create your first experiment, open the VERA Website and click the + New Experiment button. Enter a name for your experiment, then continue to the Experiment Setup page.
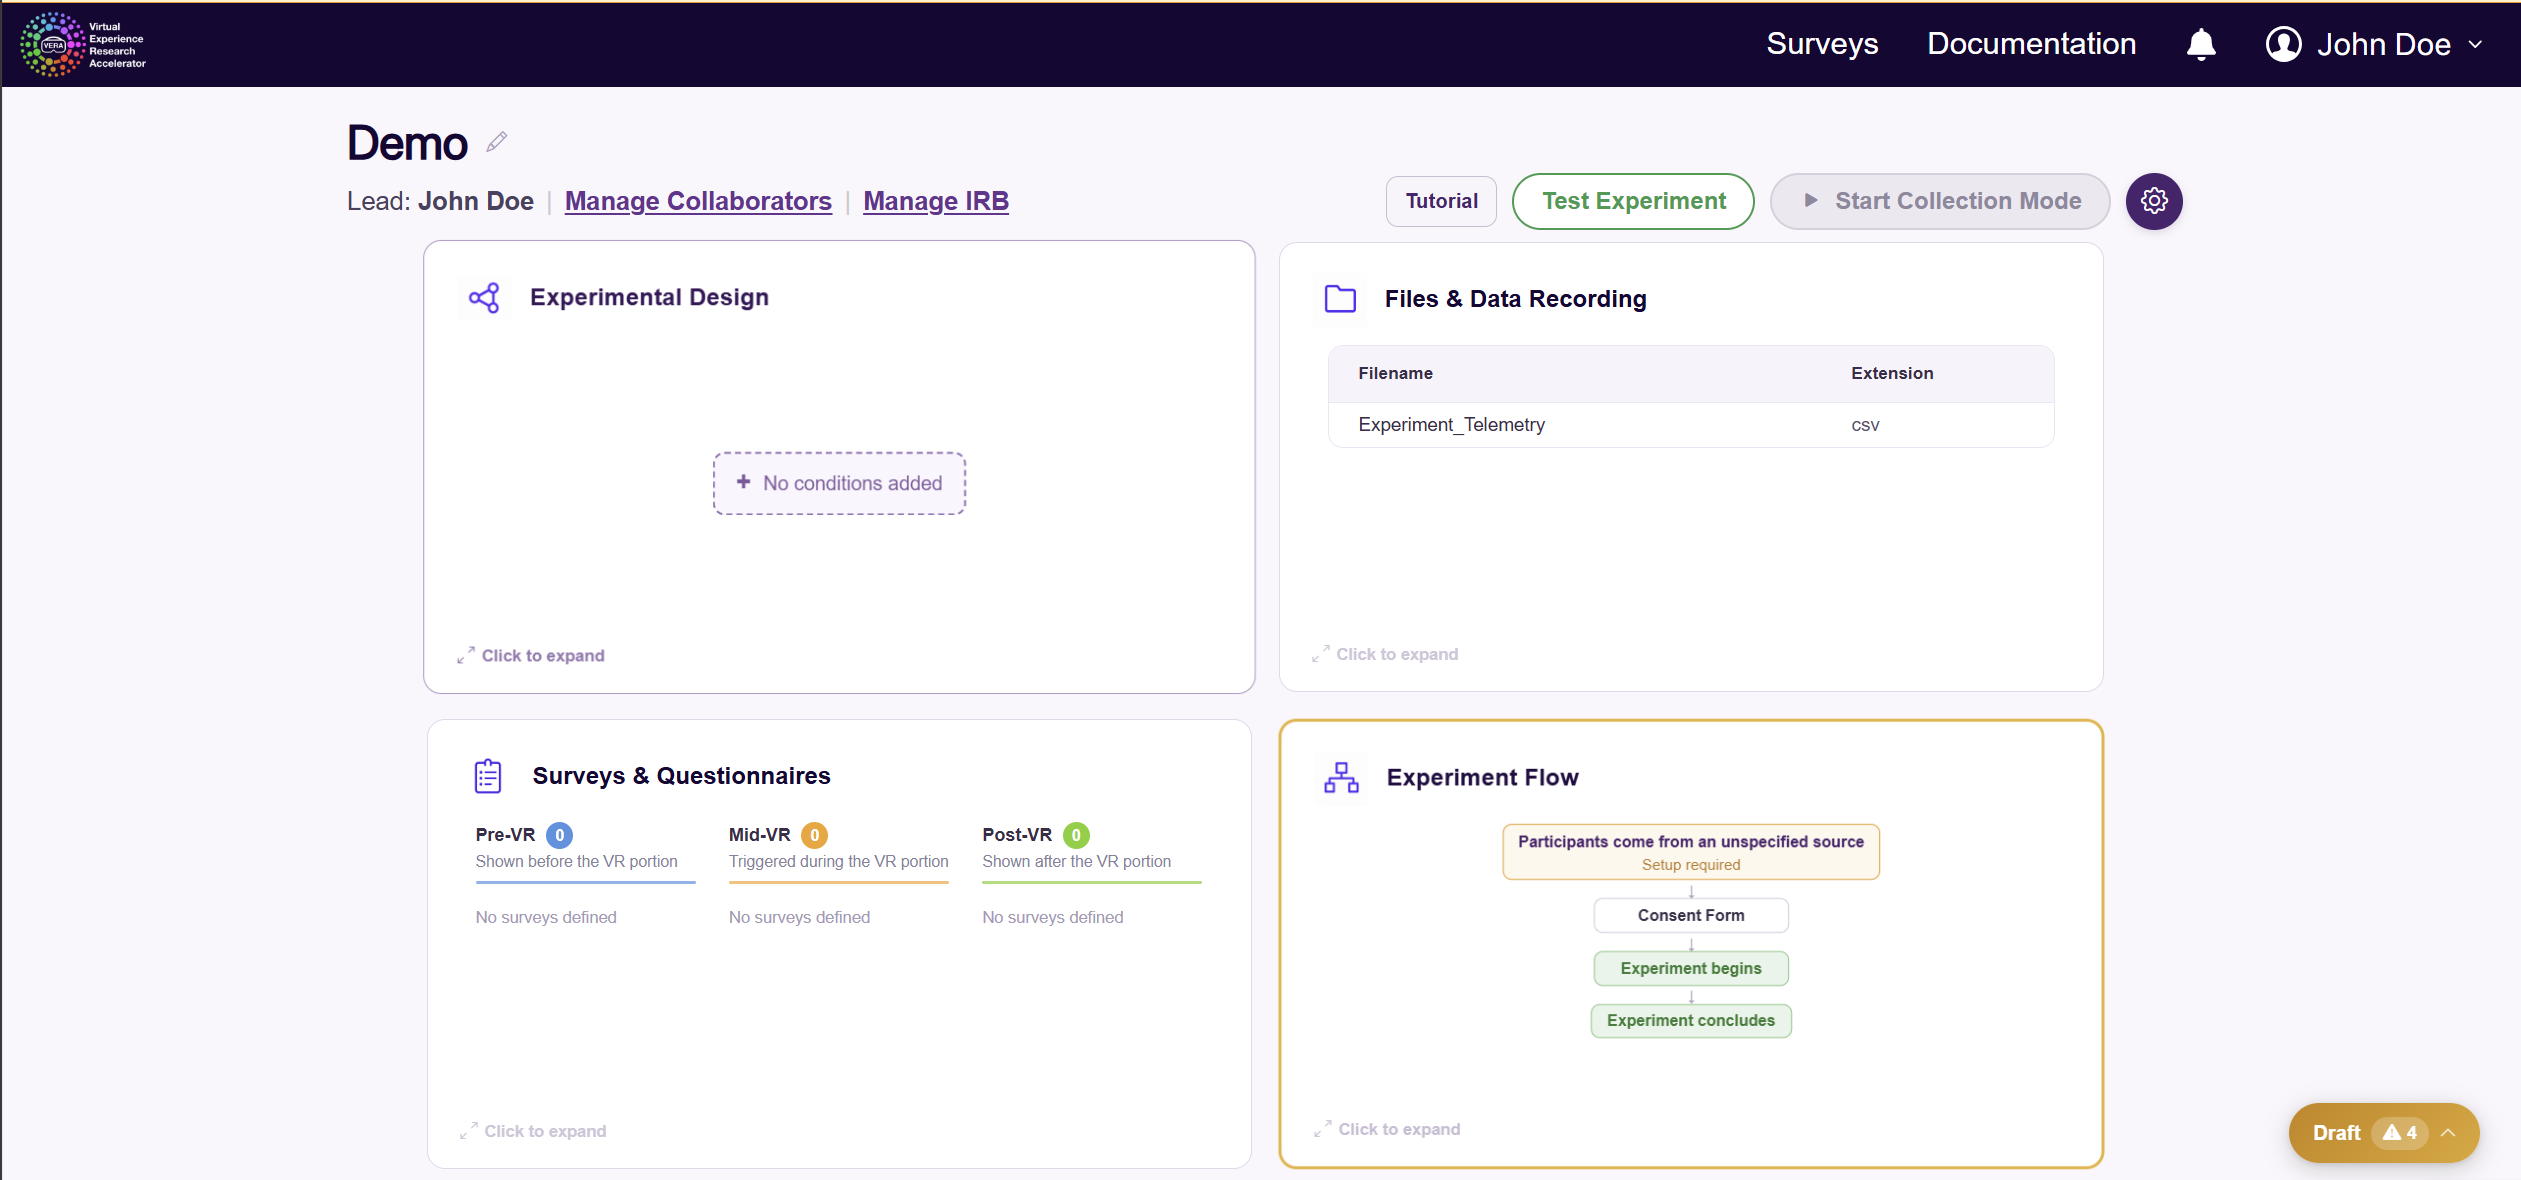
There are a few primary sections you can use to create your experiment:
Manage Collaborators: Add collaborators to your experiment, who can view and edit the experiment according to their assigned permission level.
Manage IRB: Fill out your accredited institution’s Institutional Review Board (IRB) information.
Experimental Design: Define your experiment’s independent variables and their levels. This will be used later in Unity to define the conditions participants are under.
Files & Data Recording: Define the data you will be collecting during the experiment. This will be used later in Unity to facilitate data collection.
Questionnaires: Define the questionnaires you will be using during the experiment. These can be displayed to participants over the web, or during the VR experience from Unity.
Experiment Flow: Define how participants will flow through your experiment, including the order of trials and how participants are assigned to conditions.
Each of these sections comes with its own Help Guide button, which can be used to learn more about how to use each section respectively.
A warning indicator in the bottom-right corner of the window will indicate if there are any unresolved issues with your experiment configuration.
At any point, when you are ready to test, click the Test Experiment button in the top-right corner. This will open the experiment results, where you can see the result of any test sessions you run (more details on testing later).
Set up an experiment in Unity
Now that you have created your experiment on the web interface, you need to set it up in Unity. Open a Unity project which has the VERA Unity package installed. If you do not yet have a Unity project set up, refer to the Installation and setup section for guidance.
In the Unity menu bar, click the VERA tab and select Settings. This will open the VERA Settings window. In this window, find the Your Experiment dropdown, and select the experiment you created on the web interface. This tells Unity what experiment to record data to.
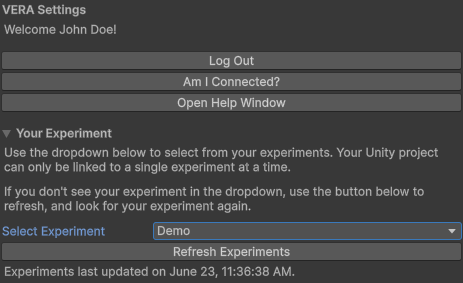
VERA will then generate special C# code for your experiment which can be used to control the experiment directly from Unity. The editor will likely force a recompile of your project, which may take a few seconds.
You may use these C# scripts in the following ways:
Condition Management: There is a static “VERAIV_[YourIVName]” class for each independent variable you defined on the web interface. Use these classes to get or set the value of a specific independent variable during the experiment. All data recorded will be automatically tagged with the current value of each independent variable.
Data Logging: There is a static “VERAFile_[YourFileName]” class for each file type you defined on the web interface. Use these classes to log data to the VERA web interface.
Questionnaire Management: There is a static “VERASurveyHelper” class which you may use to run questionnaires during your experiment. There will be an enum value for each questionnaire you defined on the web interface, named “VERASurveyHelper.VERASurveyReference.[YourSurveyName]”. Use these enums to specify which questionnaire to run during the experiment.
Session Management: There is a static “VERASessionManager” class which you may use to manage participant sessions during the experiment. You can use this to get the current participant ID, and to finalize the participant session when the experiment ends.
For more details on using the VERA Unity plugin, see the Unity plugin: overview section.
Test your experiment
To test your experiment, you can run the experiment directly from Unity. When you run the experiment, VERA will automatically create a new participant testing session for you, which you can then view in the experiment results on the web interface.
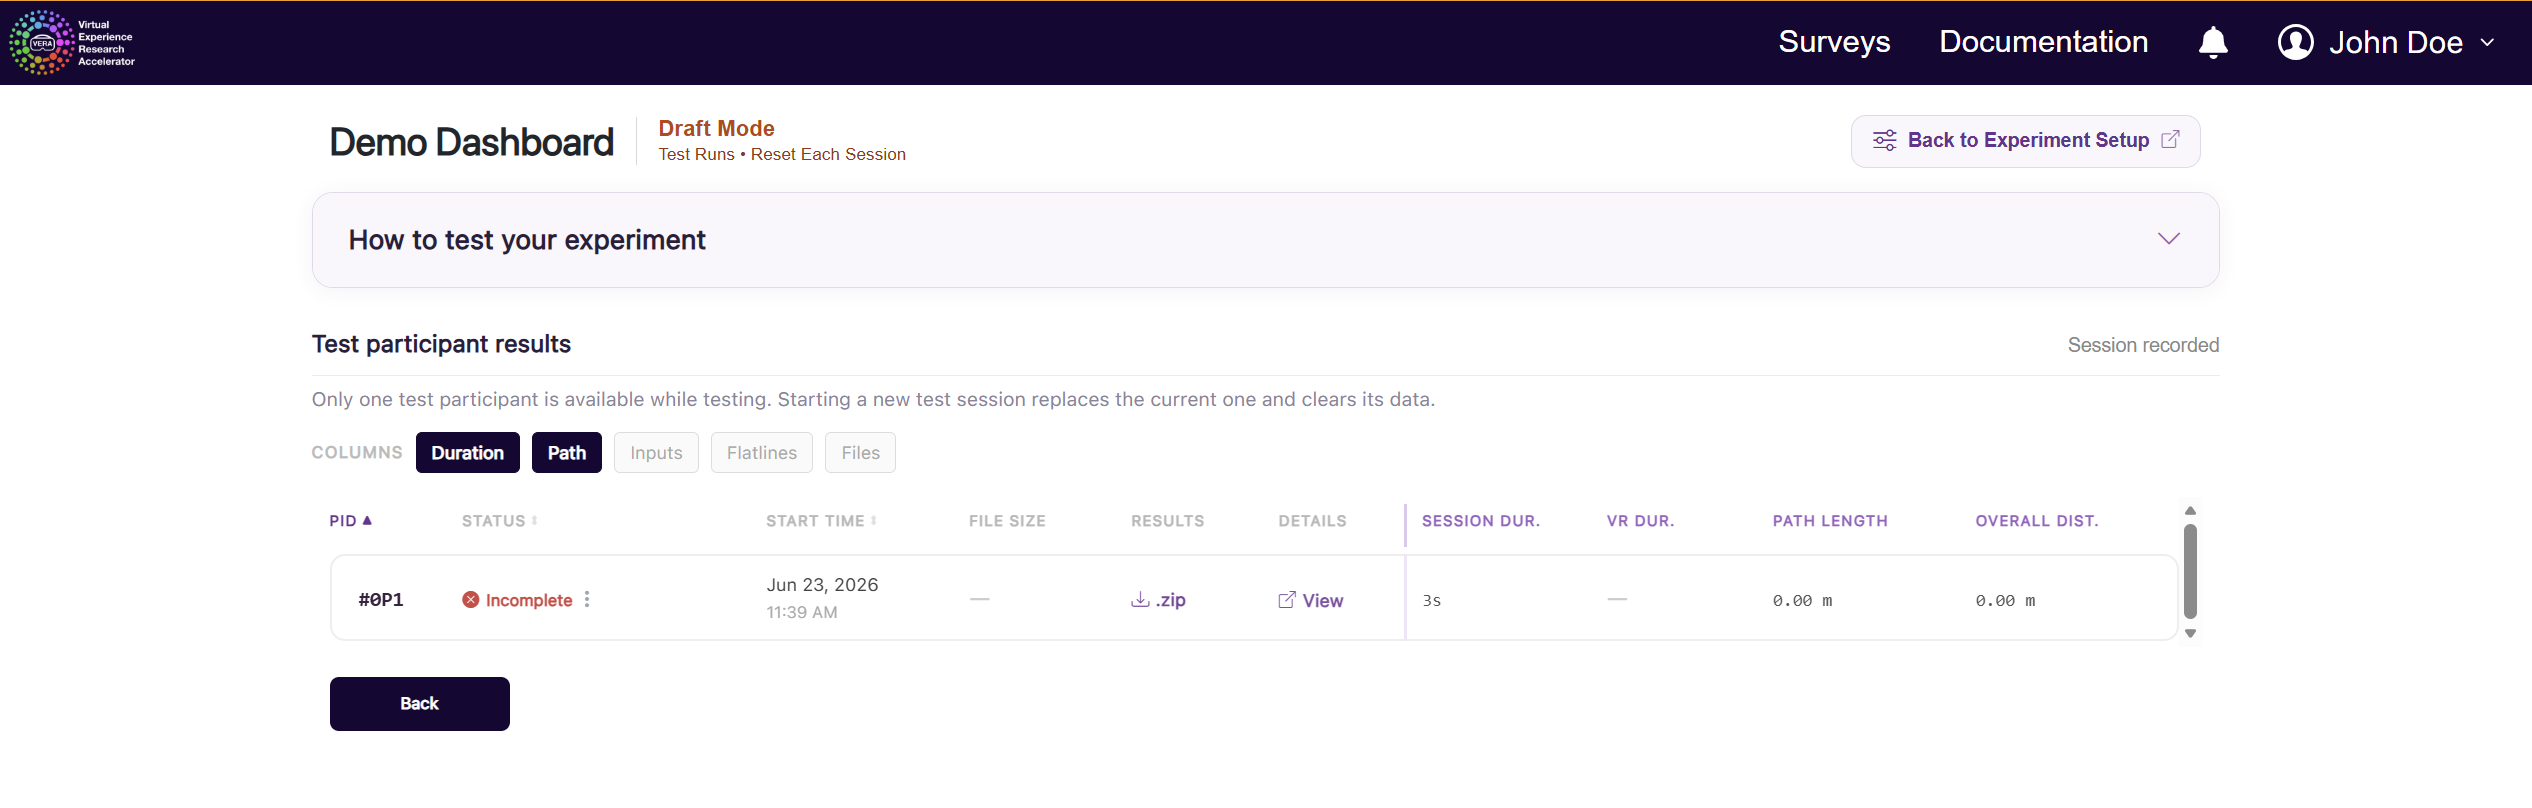
While your experiment remains in “Draft” mode, there will always be a single participant testing slot available to use for free. Each time you run a new test session, this single testing slot will “reset”, and your new test session will record over this slot. This test slot will be unavailable after transitioning to “Collection” mode, but you can always return to “Draft” mode to use the testing slot again.
Build your experiment
To build your experiment for WebXR and upload it to VERA, return to the VERA Settings window in Unity, and click the Build and Upload Experiment button. This will build your experiment for WebXR and upload it to the VERA web interface. There are no further steps required. Once the process is complete, you will be displayed a dialogue box with the results.
Once a build has been uploaded, you will be able to test out the remote context of your experiment by opening your experiment’s distribution link. On the web interface, open the experiment’s dashboard card menu and choose Distribution Link.
Once you have this distribution link, simply open it in a web browser to test out the remote context of your experiment. If there are any issues, see the WebXR guide section for troubleshooting tips.
Collect data for your experiment
When ready, return to your Draft experiment’s setup page. In the top right, there is a Start Collection Mode button - press it to enter “real” / “live” data collection mode.
This will bring you to the experiment results page, where you may define a new activation cycle. A single activation cycle will allow you to define A number of participants you are targeting to collect data for. For each participant you plan to collect, you will need to reserve a single token.
Once you activate the experiment, participants will be able to access your experiment, so long as they have access to your distribution link. Depending on your chosen context, you can send this link out via email, sign up for a recruitment platform like Prolific, or distribute in-person.
As participants complete the experiment, you can preview, approve, and download their data from the experiment results page. Every participant approval will cost a single token from your experiment’s activation budget.